
“Ball valve leaking” describes at least four different problems, and they have four different fixes. Before you compare valve designs, name the leak:
- Stem / packing area – fluid weeping around the stem, under the handle or actuator mounting.
- End connection – leakage where the valve meets the pipe: the threaded, welded or flanged joints at each end.
- Valve body joint – leakage at the joint where the valve body sections are bolted or screwed together.
- Internal leakage past the closed ball – the valve is shut, but flow continues downstream. Nothing drips outside; the leak is through the seats.
This article is about the third one. A welded-body 2-piece ball valve has no bolted body joint, so it reduces one potential external leak path. That is a genuine structural difference. It is also a limited one: it does nothing for the stem, the pipe ends or the sealing of the closed ball. Both halves of that statement matter when you specify valves for an industrial line.

| Leak point | Where you see it | What it mainly depends on |
|---|---|---|
| Stem / packing area | Around the stem, under the handle | Stem seal design and condition, thermal cycles, how often the valve operates |
| End connection | Where the valve joins the pipe | Installation quality, thread sealant or gasket, pipe stress |
| Valve body joint | At the joint between body sections | Body seal or gasket, fasteners, assembly, service conditions, maintenance |
| Internal leakage (past the closed ball) | Downstream flow with the valve closed; not visible outside | Seat condition, debris, ball surface, duty cycle |
Why Conventional Body Joints Can Become External Leak Paths
A bolted or screwed body joint is a sealed mechanical interface: a body seal or gasket, held under load by fasteners or threads. Every such interface can leak under some combination of conditions. That is different from saying it usually does.
Conventional two-piece and three-piece ball valves are assembled from separate body sections. Where those sections meet, tightness depends on several things at once: the joint design itself, the seal or gasket material and its compatibility with the media, the assembly work (torque, alignment, cleanliness), and then everything the joint experiences in service. Thermal cycling, vibration, pressure transients and the state of maintenance all play a part.
Plenty of bolted-body valves run for years without a body-joint problem. The engineering point is narrower: a body joint is one more sealed interface on the pressure boundary. It has to be designed, assembled and maintained correctly, and it is one more place an inspection round has to cover. Whether that matters in your plant depends on the service and on your maintenance practice, which is why the rest of this article is written as a comparison, not a verdict.
What Changes with a Welded-Body 2-Piece Ball Valve
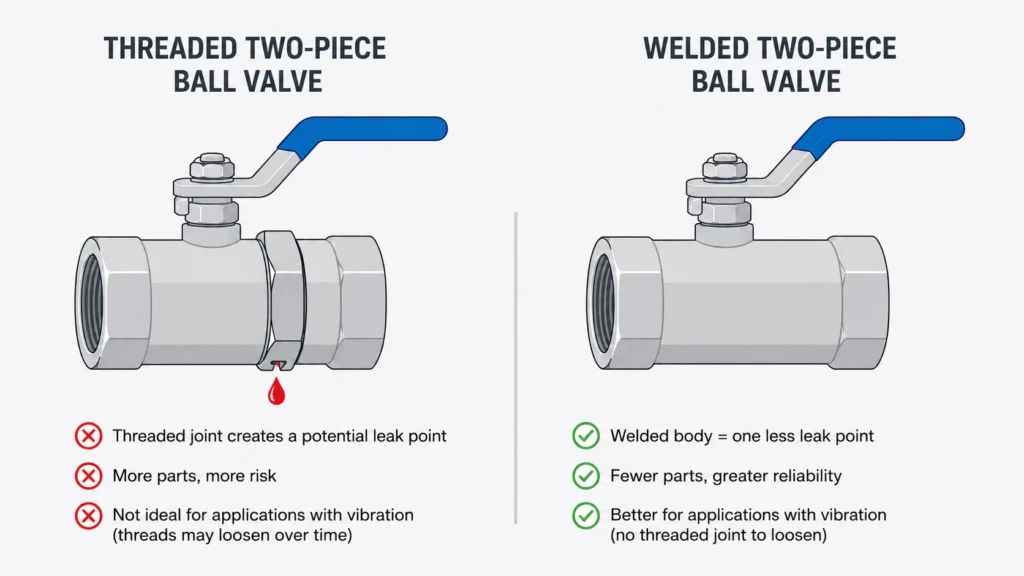
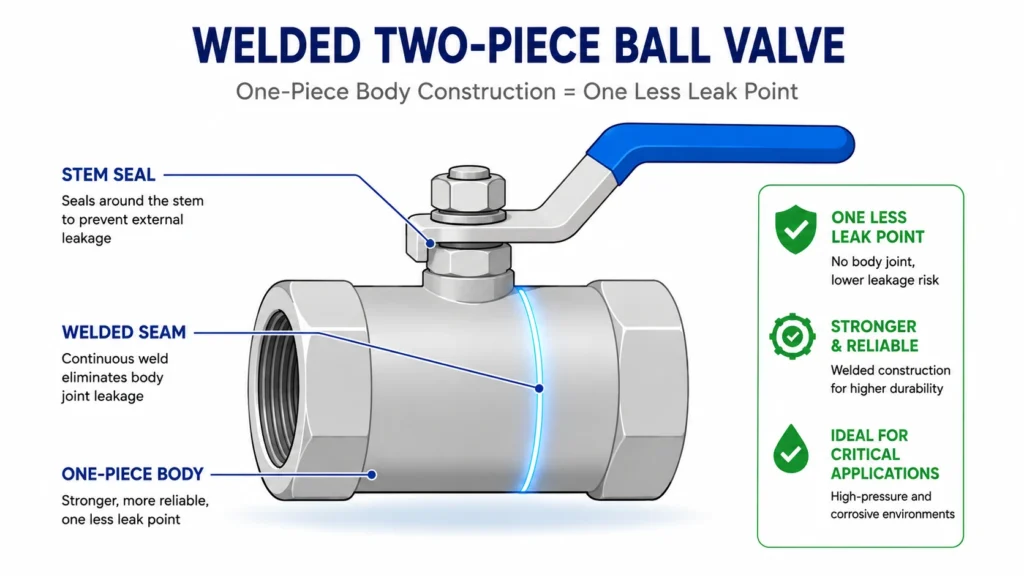
In a welded-body 2-piece design, the two body halves are welded into a single integrated body instead of being screwed or bolted together. The finished valve has no bolted body joint, so there is no body gasket to age and no body fasteners to lose preload at that location. In plain terms: it reduces one potential external leak path. It does not remove the others, and it is not a claim that the valve cannot leak.
A note on naming, because the word “welded” does double duty in valve catalogs. Most of the time, a “welded ball valve” refers to the end connections — socket-weld or butt-weld ends that are welded to the pipe during installation. That is not what this page is about. Here, “welded-body” describes how the two halves of the valve body are joined to each other; the ends of this particular valve are female threaded (F×F). If weld-end connections are what you need, that is a different product — our two-piece butt-weld ball valve — and the two constructions answer different questions.
Our welded-body 2-piece stainless steel ball valve (F×F threaded, full port, 1000 WOG) is built this way. Its published range: CF8 (cast 304) or CF8M (cast 316) stainless steel body, female threaded ends (F×F) in PT, NPT or PF from 1/4″ to 4″, full port, manual quarter-turn lever, rated 1000 WOG (a cold working pressure rating for water, oil and gas service), available as a Heavy-Duty series (V-2B) and a Standard series (V-2C). One boundary worth stating: the welded-body covers the 1/4″–3″ sizes; the 4″ model uses a bolted end-cap construction instead. The applications listed for it are water, oil, gas and air lines, tank and pump isolation, and OEM machinery.
A fair question at this point: if the goal is a body with no bolted joint, why not simply use a 1-piece ball valve? Because of what the one-piece casting costs at the bore. In most 1-piece designs the internals are assembled through the end connection, so the port is typically reduced — the flow path is one size smaller than the pipe, with the extra pressure drop that brings. The welded-body construction takes the other route: assemble the internals with the body in two halves, then weld the halves into one integrated body. The result combines the full-port flow of a 2-piece with the monolithic body of a 1-piece — no body gasket, no body fasteners. To keep the comparison honest: the weld is still a manufacturing joint, but a fused metallurgical one, not a sealed mechanical interface with a gasket to age or preload to maintain.
What remains after welding: the stem still passes through the pressure boundary, and the valve still joins the pipe at both ends. A welded-body valve therefore still has sealed interfaces — just one fewer on the body itself.
There is also a trade-off to state plainly. A welded-body is not made to be opened. If your maintenance practice depends on taking a valve apart in place to service the internals, this construction works against you, and a 3-piece design deserves the comparison. More on that below.
What a welded-body Does Not Solve
A welded-body addresses exactly one thing: the external leak path at a bolted body joint. Every other leak mechanism on the valve is untouched by it.
- Stem sealing. The stem must rotate, so it passes through the body with its own seal arrangement. Stem leakage depends on that seal’s design and condition, not on how the body halves are joined.
- Internal leakage. Seat wear, debris caught between ball and seat, or a damaged ball surface will let a closed valve pass flow, in any body construction.
- Pipe-end leakage. Threaded, welded or flanged connections to the pipe are made during installation. Their tightness is an installation and system question.
- Unsuitable material or pressure–temperature conditions. A valve whose material or rating does not fit the fluid, concentration, pressure or temperature can fail regardless of body construction.
- Installation and system effects. Over-tightening, pipe stress, pressure surge, vibration and actuator problems create leaks that no body construction prevents.
So if the leak you are chasing is at the stem, at a pipe end, or through a closed valve, switching to a welded-body will not fix it. Identify the leak point first; the table at the top of this article is the place to start.
When a Welded-Body 2-Piece Design May Be Worth Considering
A welded-body 2-piece valve is worth a look when the external body-joint leak path is specifically what you want to remove, the duty is on/off isolation, and your maintenance plan replaces valves rather than rebuilding them. If planned access to the internals matters more, compare a 3-piece design instead.
Typical situations where customers ask about this construction:
- The concern raised is specifically external leakage at the body joint, and reducing the number of sealed interfaces on the body is a stated goal.
- The service is on/off isolation — tank isolation, pump isolation, section shut-off — rather than duty that expects in-place overhaul of the valve internals.
- The maintenance philosophy for that line is replace-not-rebuild: when a valve reaches end of life, it is swapped, not opened.
If, instead, your practice includes opening valves for inspection, cleaning or internal part replacement, a 3-piece design is built for that: its body construction allows access to the internals, depending on the specific model. Our maintenance guide for 3-piece stainless steel valves shows what that maintainability looks like in practice.
| Consideration | Welded-body 2-piece | 3-piece design |
|---|---|---|
| Body joints on the pressure boundary | None; the two halves are welded into one integrated body | Bolted joints between the center body and the two end caps |
| Access to the internals | Not designed to be opened; end-of-life usually means replacing the valve | Body can be opened for inspection or service, depending on model |
| Where it tends to fit | On/off isolation where fewer external sealed interfaces is the priority | Services where planned internal inspection or part replacement is part of maintenance |
Neither construction is universally better. Confirm the choice per model, against spare-part availability and the actual service conditions, not by category alone.
Before You Specify: Confirm These Conditions
Body style is one of the last things to pick, not the first. Whichever direction you lean, confirm these points about the service before settling on a valve:
- Fluid and concentration — the exact medium, not just its family. Concentration and impurities change material suitability.
- Operating temperature — normal and peak.
- Operating pressure — including transients and surge, not only the nameplate figure.
- Pipe size — and whether full port matters for your flow.
- End connection — threaded, welded or flanged, and the standard your piping follows.
- Required shutoff duty — occasional on/off isolation, or frequent cycling with tight internal shutoff expectations.
- Maintenance access — will this valve be rebuilt in place, or replaced at end of life?
- External or internal leakage — which one is actually the concern? They point to different solutions.
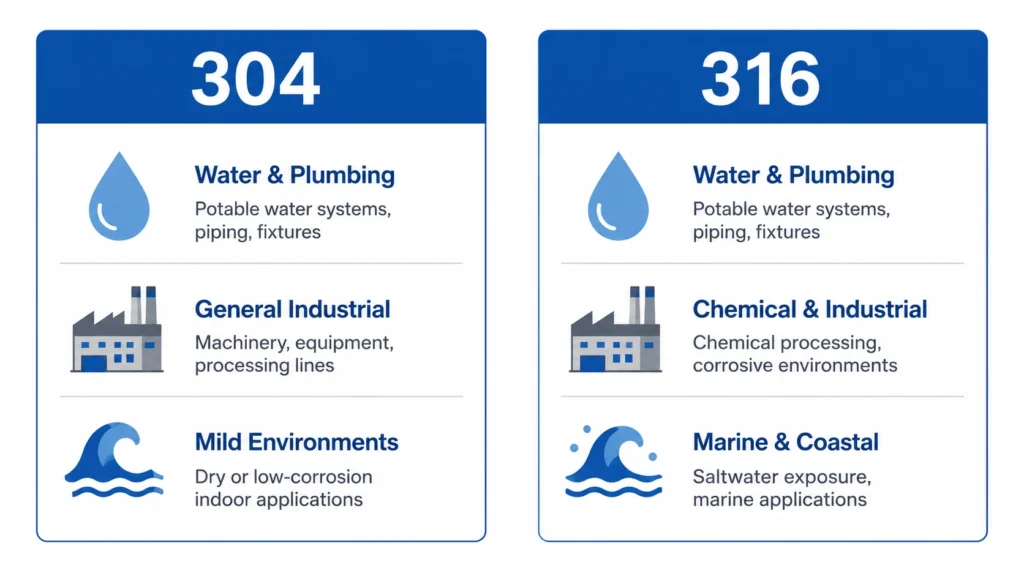
Two general references help here. On materials: within our range, 304 stainless steel covers many water and air services, while 316 is the usual step up where chloride exposure raises pitting risk; background on corrosion mechanisms is available in AMPP’s corrosion basics. On ratings: pressure–temperature rating practice for valves is defined in standards such as ASME B16.34; a WOG number is not a pressure–temperature curve, so always check suitability at your actual operating temperature.
Frequently Asked Questions
Does a welded-body mean the valve cannot leak?
No. A welded-body removes the bolted body joint, which is one potential external leak path, not all of them. The stem still passes through the body and relies on its own sealing. The pipe-end connections still depend on correct installation. Shutoff still depends on the condition of the ball and seats. A welded-body valve in the wrong material, at the wrong pressure or temperature, or installed badly can still leak. Treat the welded-body as one structural factor inside a complete specification, not as a guarantee.
Does a welded-body 2-piece valve prevent internal leakage?
No. Internal leakage, meaning flow that passes the ball while the valve is closed, is governed by the seats and the ball surface, not by how the body halves are joined. Seat wear, debris trapped between ball and seat, or damage from unsuitable service conditions can cause internal leakage in any ball valve, welded or bolted. If your problem is a closed valve that still passes flow, look at seat condition, media cleanliness and duty cycle first; body construction is not the variable that matters there.
Why not just use a 1-piece ball valve instead?
A 1-piece body does remove the bolted body joint, but in most designs it costs you the bore: the internals go in through the end connection, so the port is typically reduced — one size smaller than the pipe, with higher pressure drop. A welded-body 2-piece is assembled as two halves and then welded into one integrated body, which keeps the full-port bore while still ending with no gasketed joint on the body. If a reduced port is acceptable for your flow, a 1-piece valve is a reasonable choice; if full port matters, that is where the welded-body construction earns its place.
When is a 3-piece ball valve the better choice?
Compare a 3-piece design whenever in-line maintenance matters. Its body construction allows access to the valve internals for inspection or service, depending on the specific model. If your maintenance practice includes planned inspection or replacement of internal parts rather than swapping the whole valve, that access can outweigh the extra body joints, which then simply become part of your inspection routine. Spare-part availability and the actual service conditions decide the case; our maintenance guide for 3-piece stainless steel valves shows the procedure side of that trade-off.
Does 1000 WOG cover steam or high-temperature service?
No. A 1000 WOG marking by itself is a cold working pressure rating for water, oil and gas service. It is not a steam rating and it is not a pressure-temperature curve.
However, this welded-body 2-piece ball valve can be specified with a graphite sealing configuration for steam service up to 180°C. That temperature capability applies only to the specified graphite configuration; it must not be assumed for the standard seal arrangement.
Steam selection still requires the actual operating pressure at temperature, the exact valve model, the graphite seal configuration and the service conditions to be confirmed together. Do not select a valve for steam from the WOG number alone.
Worried About Body-Joint Leakage? Start with Your Service Conditions
If external leakage at the body joint is the concern on your line, send us the medium and concentration, operating pressure and temperature, pipe size, end connection, and how you plan to maintain the valve. With those, we can help you compare a welded-body 2-piece design against a 3-piece design for your specific conditions — including telling you when the 3-piece is the better fit. Contact Yzng Trong with your service details and we will respond with a concrete comparison rather than a generic recommendation.