
After 35 years in the fluid control industry, I have seen a recurring pattern: even the highest-quality stainless steel industrial valves can fail prematurely if they are not installed or maintained with precision. At Yzng Trong International, we take immense pride in our 3-piece ball valve design because it offers the ultimate in serviceability and durability. However, the true performance of these valves is a partnership between the manufacturer and the technician on the floor. In my decades of visiting chemical plants and refineries, I’ve realized that the “3-piece” advantage—the ability to swing the center section out for service—is often underutilized because teams aren’t fully trained on the nuances of high-pressure seating and bolt torquing. This guide is my way of passing down that institutional knowledge, ensuring that your investment in premium flow control pays off for decades to come.
Installing stainless steel industrial valves in a high-pressure system (such as a 2000 WOG environment) requires a level of care that goes beyond standard plumbing. You aren’t just connecting pipes; you are creating a pressure vessel. If the alignment is off by even a fraction of a degree, or if the welding temperature isn’t managed correctly, the internal seals can be compromised before the valve ever sees its first drop of fluid. This is where my “vascular surgeon” metaphor truly comes to life. Just as a surgeon must ensure every suture is perfect to prevent a leak, an industrial engineer must treat the installation of stainless steel industrial valves with the same meticulous attention to detail. In the following sections, we will break down the exact protocols we use at Yzng Trong to ensure our valves operate at peak efficiency from day one until year thirty.
Pre-Installation Protocols: Setting the Foundation for Success
Before a single wrench touches your stainless steel industrial valves, there is a critical preparation phase that many skip in the rush to meet deadlines. In my 35 years, I have seen more valves ruined by “construction debris” than by actual operational wear. When new piping systems are installed, they are often filled with metal shavings, welding slag, and abrasive grit. If you cycle a ball valve even once with this debris inside, you will score the precision-polished ball and ruin the PTFE seats. Therefore, the first rule of installing stainless steel industrial valves is to ensure the lines are thoroughly flushed. I always recommend installing a Y-strainer upstream during the commissioning phase to catch any rogue particles that could jeopardize the valve’s integrity.
Furthermore, you must verify that the piping is properly aligned. Stainless steel industrial valves are designed to control flow, not to act as structural supports for misaligned pipes. If you have to “force” the valve into place between two flanges or threaded ends, you are introducing mechanical stress into the valve body. This stress can lead to uneven seat wear or, in extreme cases, body cracking under high-pressure surges. I’ve walked onto sites where valves were leaking at the stem, only to find that the entire pipe run was sagging, putting lateral pressure on the valve. At Yzng Trong, we emphasize that the valve should drop into place effortlessly. This pre-installation verification is the difference between a system that lasts 20 years and one that requires constant “band-aid” fixes. We believe that professional excellence starts before the valve even leaves the box.
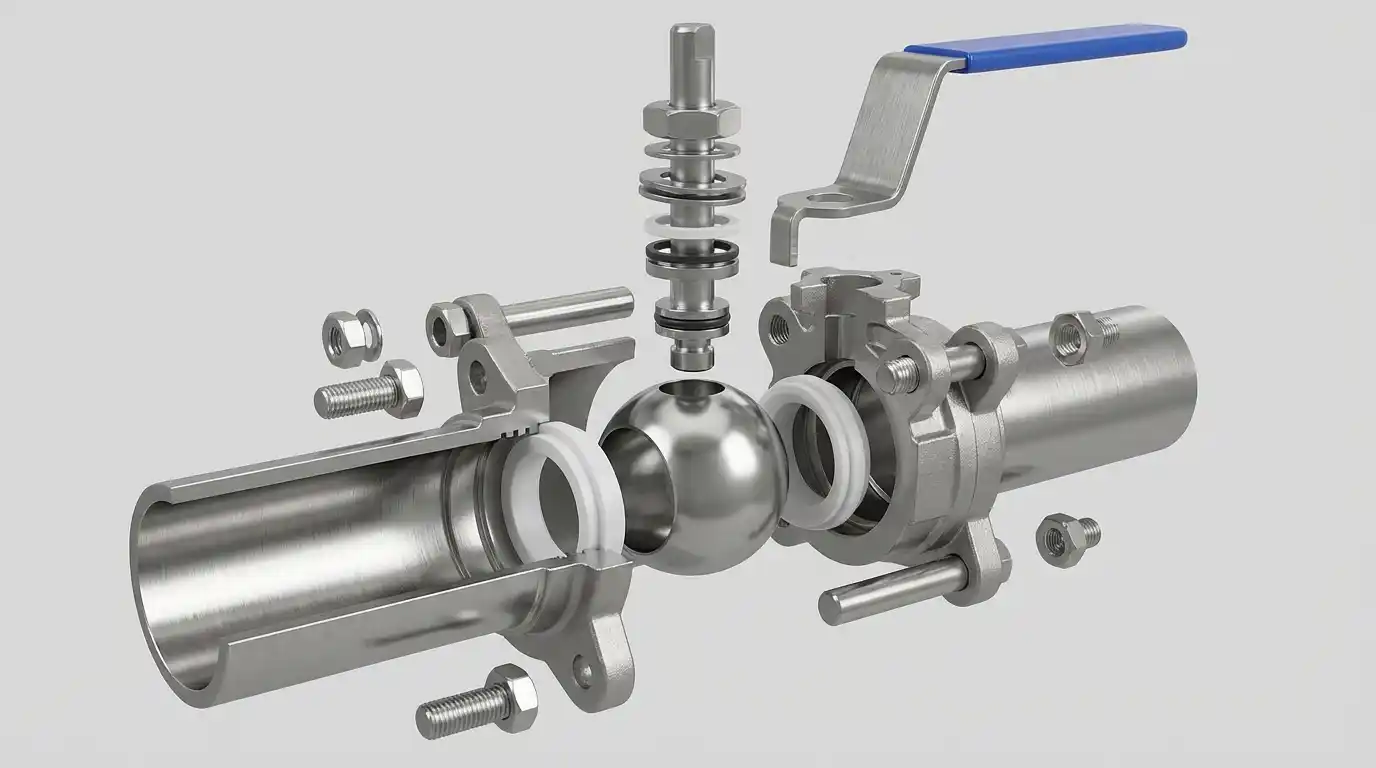
Mastering the Installation: Welding and Threading Procedures
The actual physical integration of stainless steel industrial valves into your system is where technical skill is most visible. Because our 3-piece valves offer various connection types, including Socket Weld (SW), Butt Weld (BW), and NPT threads, the technician must adapt their approach to the specific interface. The 3-piece design is particularly advantageous for welding. Unlike 1-piece or 2-piece valves where the heat of welding can melt the internal soft seats, the 3-piece design allows you to remove the center section (containing the ball and seats) before applying heat to the end caps. This is a step that I cannot stress enough. I have seen countless stainless steel industrial valves fail during commissioning because a welder was too lazy to disassemble the valve, resulting in warped seats and a permanent leak path.
Critical Steps for Welding 3-Piece Valves
When welding the end caps of your stainless steel industrial valves to the pipeline, you must first disassemble the valve. Remove the bolts and set the center body and seals aside in a clean, dust-free environment. Once the end caps are welded and have cooled to ambient temperature, the line should be cleaned again to remove any slag before reassembling the valve. In my 35 years, I’ve found that using a “tack weld” first to ensure alignment, followed by a full continuous bead, provides the best structural integrity. For Grade 316L stainless steel industrial valves, ensure you are using the correct filler rod to maintain the corrosion resistance of the joint. After reassembly, the bolts must be tightened in a star pattern—much like the lug nuts on a car tire—to ensure even pressure across the seals. This prevents “cocking” of the center section, which is a leading cause of initial-run leakage.
Precision in Threaded and Flanged Connections
For systems using threaded NPT or BSPT connections, the challenge is different but equally critical. Over-tightening is the most common mistake. When you over-torque a threaded stainless steel industrial valve, you risk “galling” the threads—a condition where the stainless steel surfaces cold-weld together, making future removal impossible without destroying the pipe. I always recommend using a high-quality PTFE tape or a nickel-based anti-seize compound specifically designed for stainless steel. Additionally, when installing flanged stainless steel industrial valves, ensuring the gasket is centered and the flange bolts are torqued to the manufacturer’s specifications is paramount. My experience in the field has shown that a torque wrench is an engineer’s best friend. Guesswork has no place in a high-pressure fluid system. By following these standardized procedures, you ensure that the valve’s mechanical environment is as stable as its metallurgical one.
Proactive Maintenance: The 35-Year Strategy for Longevity
Maintenance is not something you do when a valve fails; it is something you do to ensure it never fails. In my 35 years at Yzng Trong, I have developed a “preventative maintenance” philosophy that has helped our clients reduce their valve replacement costs by up to 40%. For stainless steel industrial valves, the primary maintenance task is regular cycling. A valve that sits in one position for a year is prone to “stiction”—where the seat material slightly bonds to the ball. By simply opening and closing the valve once a month, you keep the surfaces polished and the seals pliable. I’ve seen valves in emergency shutdown systems that were never tested, only to find them seized when they were needed most. Regular exercise is as important for your stainless steel industrial valves as it is for your own health.
The second pillar of proactive maintenance is the inspection of the packing gland. The stem of the valve is the only moving part that exits the pressure boundary, making it a potential leak point. Over time, as the valve is cycled, the PTFE or Graphite packing can compress. A simple quarter-turn of the packing nut can often stop a “weeping” stem before it becomes a major leak. However, you must be careful not to over-tighten, as this will increase the torque required to turn the valve and put unnecessary strain on the actuator or the operator’s arm. At Yzng Trong, we design our stainless steel industrial valves with adjustable packing to make this process as simple as possible. We encourage maintenance teams to keep a “Valve Log,” tracking the number of cycles and any adjustments made. This data is invaluable for predicting when a valve will actually need a full seal replacement, allowing you to schedule maintenance during planned shutdowns rather than reacting to an emergency.
Troubleshooting: Identifying and Resolving Common Issues
Even with the best care, stainless steel industrial valves will eventually face challenges, especially in aggressive chemical or high-cycle environments. Troubleshooting is a skill that blends technical knowledge with sensory observation. When I walk a plant floor, I’m listening for the hiss of a leak, looking for the tell-tale signs of corrosion, and feeling the vibration in the pipes. Most issues with ball valves fall into two categories: external leakage (stem or body seals) and internal leakage (seating). Understanding the root cause is essential. For example, if a valve is leaking internally, it might not be a failed seat; it could be a “partially open” ball due to an improperly adjusted actuator limit switch. My 35 years in the field have taught me to always check the simplest solutions first.
Diagnosing Stem and Body Seal Failures
If you notice fluid escaping from the stem area, it’s usually a sign that the packing has reached the end of its life or needs adjustment. In our 3-piece stainless steel industrial valves, this is an easy fix. If adjusting the packing nut doesn’t work, the 3-piece design allows you to depressurize the line and replace the stem seals without removing the entire valve body. Another potential issue is leakage between the end caps and the center body. This usually occurs after a thermal shock—where a sudden change in fluid temperature causes the bolts to expand at a different rate than the body. Re-torquing the body bolts to the specified levels often resolves this. I always tell my technicians: “Listen to what the valve is telling you.” A small leak today is a warning of a major failure tomorrow. By addressing these “external” symptoms early, you protect the core of your stainless steel industrial valves.
Addressing Internal Leakage and Seat Erosion
Internal leakage—where fluid passes through the valve even when it’s fully closed—is a more serious concern. This is often caused by “cavitation” or “wire-drawing,” where high-velocity fluid erodes a small path across the seat. In my experience, this happens most often when a ball valve is used for “throttling” (holding it partially open) instead of simple on/off service. Stainless steel industrial valves of the ball type are generally not designed for throttling; the high-velocity “jet” of fluid will quickly eat away at the PTFE. If you find internal leakage, the 3-piece design is your savior. You can swing out the center body, inspect the ball for scratches, and replace the seats in minutes. If the ball is scratched, it must be replaced, as a damaged ball will act like a file, shredding any new seats you install. This ability to perform “surgical” repairs is why Yzng Trong’s 3-piece valves are the preferred choice for high-uptime industries.
Technical Specifications and Maintenance Intervals
To assist your maintenance team, I’ve compiled a standardized reference for stainless steel industrial valves based on our 35 years of manufacturing data. This table outlines the typical torque requirements and suggested inspection intervals for various sizes of our 3-piece valves. Please note that these are general guidelines; if your valves are handling abrasive slurries or highly corrosive acids, you should double the frequency of your inspections. At Yzng Trong, we believe that data-driven maintenance is the only way to ensure the safety of a high-pressure facility. We provide these specs because we want our stainless steel industrial valves to perform as well in their tenth year as they did on their first day.
| Valve Size (NPS) | Body Bolt Torque (Nm) | Stem Nut Torque (Nm) | Inspection Interval | Major Overhaul (Cycles) |
| 1/2″ (DN15) | 15 – 20 | 8 – 10 | 6 Months | 50,000 Cycles |
| 1″ (DN25) | 25 – 35 | 12 – 15 | 6 Months | 40,000 Cycles |
| 2″ (DN50) | 50 – 65 | 25 – 30 | 4 Months | 25,000 Cycles |
| 3″ (DN80) | 90 – 110 | 45 – 55 | 3 Months | 15,000 Cycles |
| 4″ (DN100) | 150 – 180 | 70 – 85 | 3 Months | 10,000 Cycles |
When using this table, always ensure you are using a calibrated torque wrench. Over-torquing the body bolts can actually crush the seats, leading to higher operating torque and premature seal failure. I have seen many well-intentioned maintenance workers “crank down” on the bolts thinking they are making the valve safer, only to find that the valve now requires a pipe wrench just to turn the handle. In the world of stainless steel industrial valves, precision is always superior to brute force. We also recommend keeping a small stock of “Repair Kits”—which include new seats, stem packing, and body seals—on-site. Having these parts ready can turn a potential eight-hour plant shutdown into a thirty-minute routine maintenance task. This is the efficiency that 35 years of industrial experience brings to your operation.
The Long-Term Vision: Partnering with Yzng Trong
In conclusion, the journey of stainless steel industrial valves doesn’t end at the point of sale. It is a multi-decade commitment to engineering excellence. At Yzng Trong International, we don’t just want to be your supplier; we want to be the reason your system never fails. My 35 years in this industry have taught me that the best valves are those that are forgotten—the ones that sit in a line, doing their job year after year without needing a second thought. But to achieve that level of “invisibility,” you must start with the right installation and maintain the valve with the respect it deserves. We have seen our valves survive in the most brutal conditions on earth, from offshore oil rigs to high-purity pharmaceutical labs, simply because the teams on the ground followed these fundamental principles.
As we look toward the future, with new technologies like smart sensors and real-time flow monitoring, the basic mechanical integrity of stainless steel industrial valves will remain the foundation of everything we do. We are constantly innovating our 3-piece designs to make them even easier to service and even more resistant to the pressures of modern industry. Whether you are a long-time partner or a new client, we invite you to lean on our 35 years of experience. If you have a unique challenge or a difficult application, don’t hesitate to reach out. We love talking shop, and we love solving the “unsolvable” problems of fluid control. Thank you for choosing Yzng Trong. Let’s ensure your flow remains safe, precise, and uninterrupted for the next 35 years and beyond.